In this post I will describe how to migrate virtual machines to Azure without Virtual machine manager.
My setup:
Hyper-V host: On-premise Hyper-V Server with VM’s on it.
Azure site recovery agent: The provider which communicates with Azure site recovery over port 443 HTTPS.
Azure subscription: My azure subscription, with my storage account and virtual networks.
First create a Recovery vault in Azure Recovery Services Vaults.
Usually under “More Services” -> “Recovery services vaults” (i pinned this one to my menu) -> “+ ADD”

Next, fix the pre-requirements which are located under the “Getting started” tab which are placed in the “Settings” tab.
Step 1: Prepare the infrastructure
Protection goal:
- We want to replicate to Azure
- From my Hyper-v server
- Without virtual machine manager (VMM)
Source prepare / register the source Hyper-v host wich is placed on-premis:
- Create a Hyper-v Site (can be anything, just a name of your Azure Hyper-v Site)
- Check if the Hyper-v server can acces the following urls: (*.accesscontrol.windows.net / *.backup.windowsazure.com / *.hypervrecoverymanager.windowsazure.com / *.store.core.windows.net /*.blob.core.windows.net / https://www.msftncsi.com/ncsi.txt with port 443)
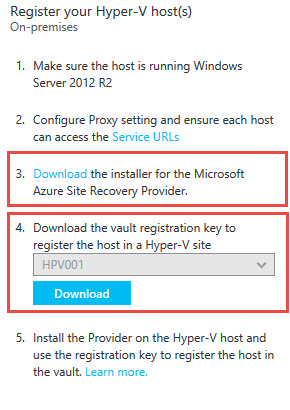
- Download the installer for the Microsoft Azure Site Recovery Provider.
- Install the azure site recovery provider on your local Hyper-v server
- After the completed setup, you must register your Hyper-v server in the azure cloud. To accomplish this you must download the register file and import this in the “after setup / register wizard”.
Target prepare:
- After 10 minutes and refreshing the azure page I saw that the server is registered in the cloud.
- Next, select your subscription and the deployment model. I prefer the new one (Resource manager).
Replication settings:
- Create a replication policy, and wait till the Hyper-V host is associated with the new policy.
Capacity planning:
- Download the capacity planner and / or Click you have completed the capacity planner :).
Step 2: Replicate application
- Select the source Hyper-v host
- Select your target Azure subscription
- Select the virtual machine you want to replicate
- Configure the virtual machine propertys (Windows / linux)
- Click on the last OK and then Enable replication.
When you look into Hyper-v Manager you see that there was taken a snapshot wich will be send to Azure.
See the replication health, right click on the VM -> Replication details

Step 3: Select recovery plan
Using a recovery plan you can specify the order of recovery of the virtual machines. The virtual machine placed in group 1 will recover and start first, and then the virtual machine in group 2 will follow.
In this example we are not using a recovery plan.
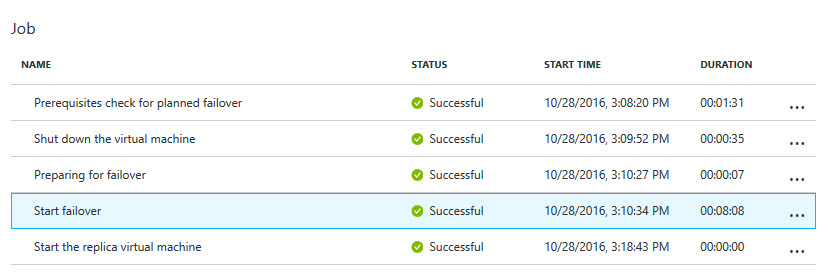
Step 4: Planned failover
Confirm you want to failover the Virtual machine from on-premis to Azure.
You may get an error about Virtual machine networks. Go to your replication VM and select the correct network settings.

Planned failover:
That’s it.
Really nice explanation
Cool! Thanks for your reaction 🙂